

Jasco paint stripper, paper towels, rags, putty knife, paintbrush, glass container, sandpaper, electric sander, and gloves
Step 1

To give this dresser a new stain I needed to get rid of layers and layers of paint and lacquer using furniture stripper. Always wear gloves and work in an open ventilated area, this stuff is toxic, it burns your skin on contact and is not good to inhale. Don't be intimidated to use this stuff, it's easy as pie, this was my first time and it turned out excellent.
Work in small areas, about one foot square. Shake the can before you use it, but make sure to open it slowly or it will explode in your face. Pour a small amount in a glass container, not plastic it will melt plastic. Use a paint brush and paint on a thick layer, let it sit a few minutes until you see blisters bubbling, then using a putty knife scrape it off and wipe onto paper towels, throw away. Repeat until the whole surface has been done, you may have to do this twice before enough paint is removed. Sand down the surface using an electric sander until the remaining paint is gone and the surface is smooth.
Step 2

Lightly sand the rest of the surfaces, apply a coat of primer, let dry and paint. I used Valspar Sanibel Gray, then stained the top. I used Old Dad's Clearcoat, the best ever but unfortunately they don't make this anymore, luckily my Dad has several cans left of this liquid gold.
Step 3
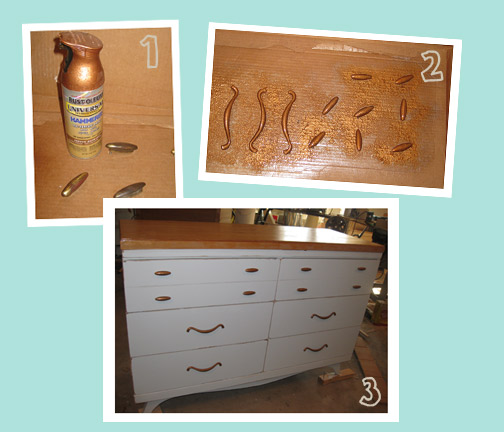

Thanks for posting this. I might be using it on a coffee table soon. I have a spray paint question. When you paint the drawer hardware with it, it doesn't chip off with use?
ReplyDeleteOh Amy what a great job....I love the hammered hardware it looks great...Great Job what is the next project can't wait...
ReplyDeleteKristi, I haven't had any hardware that I've spray painted chip. I imagine that it will eventually get worn down, but then you can just spray it again.
ReplyDeleteThanks for all the tips.
ReplyDeleteAnd great job on the dresser - love the hardware!
Alyssa
lifeoflyssie.com
thanks for the tips-- i've always been afraid to try a project like this until now! happy just something i whipped up Monday!
ReplyDeleteThe dresser looks so nice - love the drawer pulls. Dropping by from BNOTP, #7.
ReplyDeleteAllison
Your dresser looks great! Thanks for sharing your tips.
ReplyDeleteJoy@thriftyparsonageliving
indeed, thanks for the tips - i have just been too intimidated (mostly by the prospect of chemicals) to do any major furniture stripping.
ReplyDeleteand can i just say the lines on this dresser are AMAZING?? you did a great job!!
What great tips. Thank you so much for posting this. It really helps to get tips on stuff like this. Thanks for sharing at 'Look at me, I'm SO Crafty!' at Fun to Craft.
ReplyDeleteGreat post! What a huge improvement!!
ReplyDeleteI plan on doing this soon to a dresser I have.
Just what I need to find today! I'm re-finishing an entry table this weekend (hopefully). Thanks for sharing!
ReplyDeleteGreat tips! Thanks for sharing! :)
ReplyDeleteThis is a great tutorial- I wish I'd had it when I was stripping a giant armoire! Thanks for posting!
ReplyDeleteGreat looking makeover...luv the hardware! Hope you have a FUN day:)
ReplyDeleteBlessings,
Linda
Great tutorial, very useful, thanks for sharing!!!
ReplyDeleteGood tute--I don't like stripper, but sometimes it is a necessary evil. Thanks o much for linking up!
ReplyDeleteLooks so nice and fresh now! I hate stripper, but sometimes you just don't have a choice.
ReplyDeleteThanks for sharing at My Backyard Eden!
Very pretty!
ReplyDeleteThanks for joing Get Your Craft on Thursday! Please join me next week for another great party.
Great tutorial on using Paint Stripper. I love how the dresser turned out.
ReplyDeleteThanks for sharing with us at the POPP.
I know that was a lot of work. The piece turned out great and it was worth the effort.
ReplyDelete