
Many of you have contacted us asking about the details of our little red porch rockers.
I ask one thing in return...please email me the before and after pictures of your rocker remodel. I'd love to see all your great ideas post them here on Peppertowne.


I'm sorry I don't have pictures of the process.
Step #1
Prepare and paint your wood.
I cut out the lattice cane and the other seat & back material. If you have a cane seat, leave the ribbon of caning the surrounds the circumference of the seat frame that held the lattice cane in place. The wood on the rockers we found was trashed but with a light sanding and a few coats of red spray paint made a big difference.
Step #2
Create a new seat and back.
Step #3
Upholster your seat and back.
Step #4
Attach the seat and back cushion.

That's it!
Do you have other questions? Send me a quick note, I'm happy to help.
And don't forget to send me your before and after photos!
Prepare and paint your wood.
I cut out the lattice cane and the other seat & back material. If you have a cane seat, leave the ribbon of caning the surrounds the circumference of the seat frame that held the lattice cane in place. The wood on the rockers we found was trashed but with a light sanding and a few coats of red spray paint made a big difference.
Step #2
Create a new seat and back.
Get a thin piece of wood. We used 1/4 inch MDF but anything will do. First cut a pattern out of paper or scrap fabic for your seat and back. Make the pattern slightly bigger than the hole for your seat and back. This will help when it's time to attach them to the rocker.
Next trace the pattern onto your wood and cut it to shape.Step #3
Upholster your seat and back.
I stapled a thick batting to the top of the seat and back. Then stapled a lining and then the outdoor upholstery fabric to the top of the seat, trimming away excess and making a tight fit. Next, cut a piece of upholstery fabric to cover the under side of the seat and back cushion. Fold the ends of the fabric over and staple tighlty. You can glue a cute trim around your seam to create a finished look especially if the underside of your rocker will show.
Step #4
Attach the seat and back cushion.
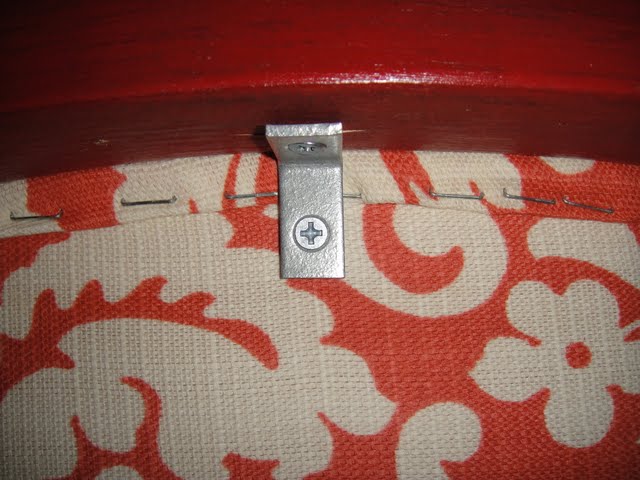
This is much more simple than it seems. Remember when you cut your board to be a bit larger than the seat and back hole? Now you can rest the finished cushon on the seat and it will sit on top of the wood of the rocker. Make sure it fits and position the seat, then add a string of wood glue on the circumference where your cushion and the seat frame meet. To secure the bond between your rocker
and your cushion add a few L brackets.
Do you have other questions? Send me a quick note, I'm happy to help.
And don't forget to send me your before and after photos!
Hi,
ReplyDeleteI have one of these chairs that was my grandmothers and I know I will never re-cane it. But I love this idea!
Can you tell me what the Red paint Brand and name is?
Thanks!
Artful Blessings,
Kathryn
Amazing transformation!
ReplyDeleteCan you give me your email? I just did a revamp of a Bentwood and would like to send you pics, but the email link will not work for me. Also, you can see my photos on my blog http://danajeanward.blogspot.com
ReplyDelete