Showing posts with label DIY. Show all posts

February 4, 2011

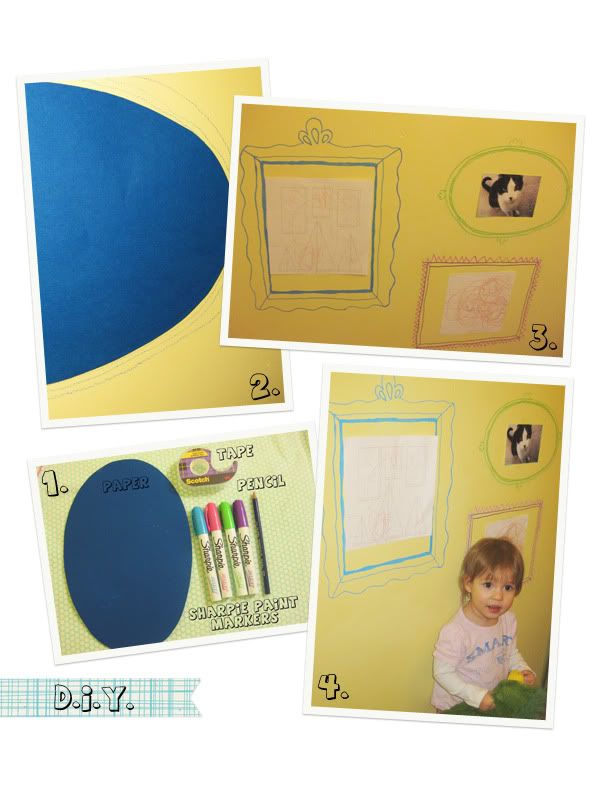
DIY: painted picture frames


1. Gather your supplies: paper, tape, pencil & sharpie paint markers. Cut the paper into sizes and shapes that you want your frames to be. Tape them to the wall leaving enough space between them, the final design will be 4-5 inches bigger than your original paper.

2. Draw your frames first in pencil, this will give you an outline to trace with the paint markers, but will easily wash off when you're finished.

3. Pick a color and paint away. Don't worry about straight lines, those little inconsistencies make it look special and unique. The wavier the better. The paint will dry within a few minutes and then you can wash off those pencil marks. I made the mistake of using a colored pencil (not so easy to wash off) so I would recommend a regular graphite pencil.

4. Let your little one show off their artwork!

-Amy


--Linking up to--
Remodelaholic
Fingerprints on the Fridge 
Kojo designs 
Tip me Tuesday
Polly want a crafter
Between naps on the porch
The girl creative

September 14, 2010

Light is Magic

Light is magic...

I read that in Elle Decor so it must be true.   Magic has happened in our office.  This discarded lamp was found at GW on dollar day.  Hurray for dollar day!!  Here it is:
(The round towheaded boy is my little man of chaos)
and a closer look:
and the before pic:


July 15, 2010

Paint Mixology

Paint.
We all love paint.
Paint is the power to change.

That's why when I came across Loris' Paint Mixology tutorial from Frugal Farmhouse Design, I knew I wanted to share it with you. She used this simple technique on an old farm table. Look how great it turned out! Click here for all the details.


June 20, 2010

Bang! Redo

from Gun Cabinet to Pantry
I found this gun cabinet on craigslist for 30 bucks, right away I saw it's potential the only problem standing in my way was sticker laminate. You know the kind, it peels off like a sticker with fake wood grain printed on it. Luckily I figured out how to paint over that stuff using Zinsser B-I-N shellac based primer. For my full product review go here.


Before:
A sad little excuse for a gun cabinet, minus the tacky glass doors etched with deer. (photo coming soon)

After: A beautiful pantry!
A little shelving, a few coats of paint, antiquing, fabric panels and presto! A place any can good would be proud to call home.

Check back later for the full tutorial.

Link Parties


June 17, 2010

Tree Swing DIY

Part One:
How To Prepare Your Chair To Become An Outdoor Swing
Look for Part Two: How To Hang Your Swing early next week

Step One:
Find your chair or bench
This is an example of what NOT to do.
(I wish I had more pictures. I didn't prepare for a DIY tutorial when we were making the swing.)

When searching for the perfect chair or bench to turn into a swing you want to look for solid wood construction with little or no upholstery.  We choose this chair because of it's shape, construction and because it was in the 'trash' bin at our local thrift shop!  $8!!
I love chairs and I've collected too many.  This chair needed a new function.

Step Two:
Prep your wood and weatherproof your upholstery
Prep your wood for painting by cleaning and lightly sanding it.  Repair any problem areas and make sure all nails and screws are tight.

Weatherproofing this upholstered seat was easy.  I removed the seat from the chair by unfastening the screws that held it in place.  Then began removing the layers of upholstery.  The second layer I found was this lovely vintage checker pattern in practically perfect condition.  I wanted to keep it. 

In order to protect it from water damage, melted popsicles and other messes, I simply placed a layer of plastic between the cushion and the fabric.  To do this, I removed the original upholstery from the cushion and then stapled it back in place with the layer of heavy duty plastic underneath it.  Simple!

By wrapping the cushion in a layer of plastic before the upholstery you accomplish two things.

1. Rain and water wont seep into the cushion and create a breeding ground for mildew and mold.
2. You make your cushion washable. My kids love this swing and have already spilled on it. I can simply hose the cushion off, let it sit in the sun for a hour and then put it back on the swing.
 
To complete the weatherproofing, we used a waterproofing spray.  You can use a scotch guard or similar product but on this particular chair we used some left over Nikwax Waterproofing spray which is usually used for outdoor camping gear like tents and jackets.  You can find Scotch Guard at any home goods store and Nikwax at most sporting goods stores.  I prefer Nikwax over most other products because it's heavy duty and also protects from the sun.  In Arizona it's not the rain we have to worry about, it's the damage from the sun.

Step Three:
Paint the chair and weatherproof the wood.

Since this swing was intended to be outside among the elements we used an exterior paint with a self primer.  We applied 3 fairly thin layers of paint making sure to cover all the seams and especially around the caning on the chair.  The chair dried thoroughly before we applied 2 polyurethane coats to protect it from the sun and rain.  This is the product we used.


Tip: When using products that layer on each other like paint and polyurethane always use water-based paint with water-based polyurethane and oil-based paint with oil-based polyurethane.

Step Three: 
Drill your holes and tie your knots

When you hang your swing you want it to tilt backwards slightly to create a comfortable place to sit.  Think about this concept when you drill the holes for you rope.  We drilled 6 holes.  Two in the front and four in the back.

The holes in the front look like this:

The holes drilled on the backside of the chair look like this:
On the backside of your chair or bench you will want to drill two holes on each side.  This will help stabilize your swing so it doesn't tip back all the way and dump you out on the grass!  Notice how we drilled the holes so when we put the rope through it's on a diagonal.  This adds extra support and strength.

Once you've drilled your holes, string your rope through the holes.  If you haven't gone to Harbor Freight yet, you should.  We bought about 75 feet of braided poly rope for less than $5.  It's perfect. It's heavy duty, mildew and rot resistant, will stretch a little and hold a capacity of about 250lbs. 

Next, it's time to tie your knots.  I'm not exactly sure what this knot is called (maybe a half-hitch) but I like it for two reasons.
1.  It's the kind of knot that when you put pressure and weight on it, it tightens it's grip.  So it will never come undone and risk dumping you out of your swing.
2.  It looks like a pretty braid when your finished.

Step 1: String your rope through your holes leaving 1-2 feet of rope to work with.
Step 2: Wrap the loose end of the rope around the back of the rope that will be hanging from your tree or porch.  Then pull the end underneath itself.  See step 3 for more details on this.
Step 3:  # 1 Pull the rope up. #2 Pull the rope behind the other piece. #3 Pull the end underneath itself.
This action is also known as "the rabbit (the end piece of your rope) goes around the tree (#2) and then into the hole (#3)"
Step 4: Pull tightly and you will create your first knot.
Step 5:  Do it again.  The rabbit goes around the tree (#2) and through the hole (#3).
Step 6: Then pull tightly.
Take the rabbit around the tree and through the hole as many times as you like.  When your finished, burn the end of your rope to keep it from fraying.
And that's it!  Complete the other sides of your chair and soon you'll be ready to hang up your swing.

I hope you didn't cut the legs of your chair off yet!  They'll be helpful in hanging your swing. 
Hanging the swing in your tree can be tricky.  Tune in next week for Part 2: How To Hang Your Tree Swing.  We found a method that is simple and works well.  Your swing will hang evenly and it also allows for you to easily remove your swing from the tree.  This is especially helpful for winter storage or if you live in the Southwest like me, storage from monsoon season! 

So that's Part One! 
As always if you have any specific questions please email me here.

May 13, 2010

May 10, 2010

Painting the roses red

What happens when you mix ordinary silk flowers with a string of Christmas lights?
Separate the flower and take out all the plastic parts holding the bloom in place and throw away. This will leave you with about 5 flower petals, divide them and make two flowers instead of one. Thread a light bulb through the hole in each flower petal, and hot glue the petal to the light. Plug in and you have a pretty string of party lights.


Link Parties:


DIY Day @ ASPTL

May 9, 2010

DIY: Cheese Dome


What in the world is a cheese dome?  
That's what I asked Kelly, our friend and fellow local blogger
 from My Dear Trash, when she posted her Cheese Dome Gone Chic. 
Since then, I've found a few and here's my version.


Do It Yourself!
Supplies Needed:
Cheese Dome (obviously)
Plates that fit your dome
Candlesticks of varying heights
Liquid Nail
Spray paint
Ribbon

Simply spray paint your candlestick.  Next, use Liquid nail or some other strong adhesive to glue your plate to your candlestick.  Let it cure overnight.  Then add your dome and a few little ribbons or tags... they'll look so 'chic' displayed on your dining table.  Imagine them filled with fresh baked pastry or Easter Eggs or Christmas chocolates!!

  As always, just email me with any questions here.

My friend also made her version of this project and they are beautiful.  I love seeing different styles and interpretations of the same idea.  I'll see if I can sneak over to her house and snap a few photos.  Look for DIY: Cheese Dome Part II in a few days. 


DIY Day @ ASPTL

May 2, 2010

window seat taa-daa!

Confession:  I lost the 'before' picture for this project.

I swear I took the pic.  But where is it?
I've search through the endless piles of photo chaos on my computer.  Oh, don't judge me.  You know the photo chaos...you've been lost in it too. 
The abyss of unmarked photos scattered all over your computer.  

Promise: I promise to save my pictures in a marked and uber-organized way.  At lease until I'm in a hurry or the cheese quesadillas are burning...

Craigslist rules!  I found a photo similar to the coffee table I originally bought.
My coffee table cost me $10 bucks.  But, I needed a window seat!  
I was looking something with modern lines and a neutral feel.

TAA-DAA!!


This was an easy project with some basic upholstery. 

Step #1: Prep and paint the wood frame.
After removing the lovely smoke mirrored glass, I painted the table and then sanded up the edges a bit to let the dark wood show through.

Step #2: Cut some wood board to replace the glass mirrors. 

Step #3: Cut a piece of foam for the bench seat.  The best way to cut foam is a band saw.  But if you don't have one, the second best way is with a sereded kitchen knife.
Glue the foam to the board using spray adhesive.


Step #4: Using a staple gun, cover the foam with a liner cloth. 
Securely staple on the backside of the board.  Use a firm even pressure around the edges.  As you can see in the picture, I use my body weight to push foam in and then staple the fabric.  This makes a nice rounded edge on your seat. 


Step #5: Cover your seat with the upholstery fabric.
Using the same technique as the liner cloth, use a firm even pressure and staple the fabric in place.  Always cut away and excess fabric.  Pull your corners in and staple them like crazy. Remember, the underside of your project doesn't have to look perfect.  This is not an art of perfection...and that's why I love it!  Also, I'm using an air powered staple gun, which is the bomb.  If you don't have access to one of these, a hand powered gun is great.  I've done many many project with a hand gun.
Step #6: Staple your trim.
Adding a trim gives finished look to your project.  Here I choose a burlap natural fiber that fit in with my neutral scheme.  Simply, staple the trim along the edge of your board. 
 
Here's a trick I learned from a great upholsterer, when the two ends of your trim meet, simply unravel the ends, cross them over each other and staple in place on the underside of the board. This way your cushion will fit perfectly without the added bulk of the extra trim.


 Step #7: Put your bench together.
Add a few L brackets to secure your seat.

That's it!
Enjoy your bench!


Related Posts Plugin for WordPress, Blogger...