Showing posts with label Tutorials. Show all posts

November 4, 2010

Blog Crush


Have you ever discovered a blog that was so good, you weren't sure if you should share it or hoard it all for yourself? My new found favorite is that good, so good that I almost didn't share it with you, but in the name of holiday spirit here she is...Pugly Pixel. Her upcoming e-course on the basics of blogging and blog design is definitely something worth signing up for. She has great tips and tutorials for photo-shop, along with tons of really cool freebies, such as these.


May 10, 2010

Painting the roses red

What happens when you mix ordinary silk flowers with a string of Christmas lights?
Separate the flower and take out all the plastic parts holding the bloom in place and throw away. This will leave you with about 5 flower petals, divide them and make two flowers instead of one. Thread a light bulb through the hole in each flower petal, and hot glue the petal to the light. Plug in and you have a pretty string of party lights.


Link Parties:


DIY Day @ ASPTL

May 2, 2010

window seat taa-daa!

Confession:  I lost the 'before' picture for this project.

I swear I took the pic.  But where is it?
I've search through the endless piles of photo chaos on my computer.  Oh, don't judge me.  You know the photo chaos...you've been lost in it too. 
The abyss of unmarked photos scattered all over your computer.  

Promise: I promise to save my pictures in a marked and uber-organized way.  At lease until I'm in a hurry or the cheese quesadillas are burning...

Craigslist rules!  I found a photo similar to the coffee table I originally bought.
My coffee table cost me $10 bucks.  But, I needed a window seat!  
I was looking something with modern lines and a neutral feel.

TAA-DAA!!


This was an easy project with some basic upholstery. 

Step #1: Prep and paint the wood frame.
After removing the lovely smoke mirrored glass, I painted the table and then sanded up the edges a bit to let the dark wood show through.

Step #2: Cut some wood board to replace the glass mirrors. 

Step #3: Cut a piece of foam for the bench seat.  The best way to cut foam is a band saw.  But if you don't have one, the second best way is with a sereded kitchen knife.
Glue the foam to the board using spray adhesive.


Step #4: Using a staple gun, cover the foam with a liner cloth. 
Securely staple on the backside of the board.  Use a firm even pressure around the edges.  As you can see in the picture, I use my body weight to push foam in and then staple the fabric.  This makes a nice rounded edge on your seat. 


Step #5: Cover your seat with the upholstery fabric.
Using the same technique as the liner cloth, use a firm even pressure and staple the fabric in place.  Always cut away and excess fabric.  Pull your corners in and staple them like crazy. Remember, the underside of your project doesn't have to look perfect.  This is not an art of perfection...and that's why I love it!  Also, I'm using an air powered staple gun, which is the bomb.  If you don't have access to one of these, a hand powered gun is great.  I've done many many project with a hand gun.
Step #6: Staple your trim.
Adding a trim gives finished look to your project.  Here I choose a burlap natural fiber that fit in with my neutral scheme.  Simply, staple the trim along the edge of your board. 
 
Here's a trick I learned from a great upholsterer, when the two ends of your trim meet, simply unravel the ends, cross them over each other and staple in place on the underside of the board. This way your cushion will fit perfectly without the added bulk of the extra trim.


 Step #7: Put your bench together.
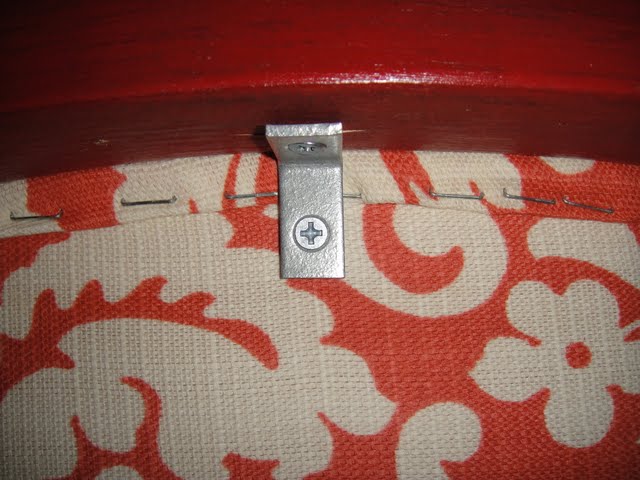
Add a few L brackets to secure your seat.

That's it!
Enjoy your bench!


April 27, 2010

Rock n Roll 2

 Many of you have contacted us asking about the details of our little red porch rockers.
You asked...and here it is.

Click here for the original Rock-n-Roll post.
I ask one thing in return...please email me the before and after pictures of your rocker remodel.  I'd love to see all your great ideas post them here on Peppertowne.
Click here to email me your pictures.

Tip, Tricks & a mini-Tutorial
I'm sorry I don't have pictures of the process.

Step #1
Prepare and paint your wood. 
I cut out the lattice cane and the other seat & back material.  If you have a cane seat, leave the ribbon of caning the surrounds the circumference of the seat frame that held the lattice cane in place. The wood on the rockers we found was trashed but with a light sanding and a few coats of red spray paint made a big difference.

Step #2
Create a new seat and back.
Get a thin piece of wood.  We used 1/4 inch MDF but anything will do.  First cut a pattern out of paper or scrap fabic for your seat and back.  Make the pattern slightly bigger than the hole for your seat and back.  This will help when it's time to attach them to the rocker. 
Next trace the pattern onto your wood and cut it to shape.

Step #3
Upholster your seat and back. 
I stapled a thick batting to the top of the seat and back.  Then stapled a lining and then the outdoor upholstery fabric to the top of the seat, trimming away excess and making a tight fit.  Next, cut a piece of upholstery fabric to cover the under side of the seat and back cushion.  Fold the ends of the fabric over and staple tighlty.  You can glue a cute trim around your seam to create a finished look especially if the underside of your rocker will show.

Step #4
Attach the seat and back cushion.
This is much more simple than it seems.  Remember when you cut your board to be a bit larger than the seat and back hole?  Now you can rest the finished cushon on the seat and it will sit on top of the wood of the rocker.  Make sure it fits and position the seat, then add a string of wood glue on the circumference where your cushion and the seat frame meet.  To secure the bond between your rocker
and your cushion add a few L brackets.

That's it!
Do you have other questions?  Send me a quick note, I'm happy to help.
And don't forget to send me your before and after photos!

April 25, 2010

Back in Time

This little garden bench is ho-hum. 
I don't love it.
Saturday a friend took me to a little shop that featured 
heavily weathered and worn pieces.
I was inspired!
I dragged the bench into my shop and began to work.
Now, I love it!!


Do you want to make a drop down for your link parties.
Click here for Amy's great tutorial.
-----

And, some of you have asked, "How did you do this?"

It's simple. 

Step #1:  Paint your furniture piece.  Paint layers of different colors.  On this bench I painted it white and then blue.  A friend and I were coming up with ideas for an old black table she has.  She wants to make create this severly weathered, worn and distressed look with layers of paint.  So, were going to paint a layer of pink and then a layer of white...I can't wait to see how this project turns out.

Step #2: Get out your can of paint stripper.  The same stuff Amy used on this beachy dresser remodel.  Randomly brush the stripper over your painted piece of furniture.  Once the stripper begins to crinkle the paint scrape it off in big and little chunks revealing the different colors below.  I was even able to strip down to the bare wood in some spots which gave this a great organic feel. 

Step #3: Use a stain to 'dirty up' the paint job.  I used a dark walnut.  Using a rag, wipe the stain on and let it sit for a few minutes then wipe it off.  Repeat if you want a dirtier look.
Then you can seal your project with a satin clear coat.

And that's it!
Good luck.  And send us any photos of before and afters of your project!

If you have any other questions about this project, email us here.


April 8, 2010

A little table

I'm guest posting this Friday at Sumo's Sweet Stuff
stop by and check out this DIY


Sumo's Sweet Stuff
-Amy-

Link Party


March 30, 2010

Antique Metal Sign DIY

I saw this laundry sign in a popular store for way too much money so I made my own. I happened to find a piece of sheet metal exactly the size I needed in my Dad’s shop, we think it was an old electrical panel cover. You could easily make your own by cutting a piece of sheet metal.

Step 1 
Spray paint the base coat whatever color you want (Rust O’leum Aqua) let dry. Make your stencil using a program such as photoshop. If you don’t have photoshop or want to save time you can download my PDF’s. My stencil is in three pieces in order to fit on regular printer paper, after you cut out the writing then tape all three sheets of paper together.

Step 2
After the paint is completely dry spray the back of the stencil with spray adhesive, let it dry a few seconds, apply your stencil. This is the tricky part, getting it on straight and even. As you can tell mine is a little crooked, I didn’t mind because I wanted it to look a little more rustic anyways. Whenever I mess up on something I always say, “That’s just how I wanted it.” 

Make sure your entire base coat is covered up by either the paper stencil or with blue painter’s tape, except where you want your topcoat to be. (Rust O’leum Antique White) Spray with a thick coating of topcoat, let dry. Peel off stencil.

Step 3

Step 4
Use sand paper and sand around edges and across the writing to make it look older. Spread a thin layer of glaze or dark stain over the top and wipe off until the desired affect is achieved. I did this several times using very thin layers until it looked aged.

Download the PDF's here:
Stencil Part 3

Link Party
The Twice Remembered Cottage 
Cottage Instincts 
Between naps on the porch 
The Girl Creative
Sumo's Sweet Stuff
The Persimmon Perch
Skip to My Lou  
Keeping it Simple 
A Silly Little Sparrow
Today's Creative Blog
Reinvented
A Soft Place to Land
Tip Junkie
Cottage Dreamers 
My Backyard Eden
The Thrifty Home
It's So Very Cheri
We are that family
Just a Girl
Blue Cricket Design
Someday Crafts
Trendy Treehouse
Women who do it all
The Shabby Chic Cottage
Beyond the Picket Fence
Somewhat Simple
Thrifty Thursday
Life as Lori
The Shabby Nest
Finding Fabulous
My Romantic Home
It's Fun to Craft
Kojo Designs
Remodelaholic
Fingerprints on the Fridge
Lit and Laundry
Funky Junk Interiors
One Crafty Mommy
Poppies at Play
Tatertots and Jello


March 24, 2010

Vintage Soap Box DIY


I wanted a vintage laundry soap container for my laundry room makeover, I decided to make one out of an empty cereal box, here's how I did it.

Cardboard box, such as a cereal or cracker box
Mod Podge
Sponge Brush
Print outs of vintage soap boxes, found online (search in google images for vintage soap)

Step 1
 Glue the box top flaps down using either Mod Podge or hot glue. Working one side at a time cover with glue, add paper making sure to remove wrinkles and press excess paper around corners. Let Dry

Step 2

March 8, 2010

DIY: Button Tufted Ottoman

I have fallen in love with tufting! The look and feel are so lux.
This used ottoman was a thrift store find that needed a little love.
Now, it's a perfect place for your feet!
Supplies & Tools
Safety goggles (If I didn't mention these, I'd get in trouble with my father-in-law)
One old, dilapidated ottoman
Flathead screwdriver or other flat pointed tool for removing staples
Needle nose pliers
Buttons
Spray adhesive
Long upholstery needle and knitting needle
Upholstery fabric (I used 2 yards)
Liner fabric (I used 1 1/2 yards)
Finishing fabric and ribbon
(I used 1 yard fabric & 2 1/2 yards ribbon)
Thin sheet of plywood
Staples & staplegun
Upholstery string or twine
Screws or nails
Hammer and drill
Hot glue and glue gun
and...
One eager little helper.

Step One:
Strip your ottoman down.  Remove the legs (they usually screw out) and all the fabric, removing as many staples as you have patience for.  This ottoman had 4 layers of fabric!  Seperate the top foam and batting piece from the bottom hardware.  If the foam and batting are in bad shape, replace it. 


Step Two
Measure your ottoman and cut the plywood to be about 1 inch shorter around the edges.  Measure and pre-drill holes for your buttons.  Buttons are usually attached in a grid or diamond pattern.  For this ottoman I spaced 9 buttons in a grid. I drew my grid and drilled the holes using the
largest drill bit in my Man's workshop.  Using spray ahesive, attach the board to the backside of your foam.

Step Three
Attach your liner.  A liner can be any simple cotton fabric or even an old sheet.  The purpose is to control the shape of your foam and batting.  Start stapling in the center of each side.  Stretch the fabric tightly to create an even shape.  Then work the corners of the ottoman in the same way folding the excess in.  Next, finish the edges stretching the fabric firmly.  If you have any gaps, like in photo #3, just pull tight and staple.
Don't be afraid to get staple-happy!  You can never use too many.

Once the liner is attached, assemble your ottoman upside down and centered on your upholstery fabric.  Use your eye to measure how much fabric you will need to cover each side.  Then remove the bottom harware piece so you can begin adding the buttons to your foam.
This is the fun part!


Step Four
Using upholstrey twine thread your button.  To do this, first, fold your twine in half creating a loop.  Thread the loop through the button and double it over so that the button is attached to the twine. 
Use the knitting needle to push through your pre-drilled hole into the foam and out the front side of your fabric.  Poke the needle in and out and few times to create a path for your upholstrey needle.
Starting from the foam side, or back side, push your upholstrey needle through the hole and out the top of the fabric.  Then slip the two loose ends of the twine into the eye of the needle and pull the needle out the bottom.  You may need to use your needle nose pliers.  Remove the needle and pull the twine and button tight.  Attach the twine with staples in a zig-zag pattern and then tie a knot.  This holds the button firm.  Make sure each button is pulled with the same tightness to ensure an even uniform look.


Step 5
Assemble your ottoman.  I attached the bottom and top piece with a few screws.  I drilled my holes and then inserted the screws to hold the pieces securely together.  I prefer screws over nails because the wood on this ottoman is brittle and could split. 
 

Step Six
There will be a natural pucker of fabric at each button.  Starting at the center, fold the pucker and pull it tightly toward the bottom of the ottoman.  It's important to pull tightly on the fabric.  Loose upholstrey will look awful.  Secure the fabric firmly with your staple gun.  Use a hammer to tighten any loose staples.
Next fold your corners.  Pull the excess fabric out (like picture #4) and then fold the seams in and staple
(picture #5).

Cut away excess fabric from the center and make sure all edges are tightly stapled.

Step Seven
Attach your finishing fabric.  Use any cotton fabric to finish the bottom of your awesome new tufted ottoman.  Pull the fabric tightly across and staple.  Again, nailing down any loose staples.  Next, hot glue a ribbon around the bottom fabric seam to hide the unfinished edges.  Then, screw the feet back into place. 


Ooooh La La! A beautiful velvet tufted ottoman!
Now kick your feet up and relax.


You can do it!

If you'd like to share a great before and after project on our blog, simply email your low-resolution before and after pictures here and we'll feature you.

Related Posts Plugin for WordPress, Blogger...