Showing posts with label furniture. Show all posts

July 16, 2010

Stunned


If you haven't seen this transformation already, take a look. 
I am absolutely STUNNED!


July 15, 2010

Paint Mixology

Paint.
We all love paint.
Paint is the power to change.

That's why when I came across Loris' Paint Mixology tutorial from Frugal Farmhouse Design, I knew I wanted to share it with you. She used this simple technique on an old farm table. Look how great it turned out! Click here for all the details.


July 14, 2010

Wedding Bells & Record Players


(Hi Haley!  I lifted this great photo off your facebook!)

Our beautiful cousin, Haley, is tying the knot in a few weeks.
Congratulations to Myles and Haley.  Adorable!

Last weekend, Amy and I began brainstorming the perfect Peppertowne-style gift for her wedding.  Something recycled, something remodeled and something unique.  Under all the thrift store rubble and dust we found an old record console.  It's Fantastic!  Beautiful!  And has all the potential we were looking for.
$25 Bucks later Amy was loading it into the back of her Matrix.

Since then, we've been hatching plans and ideas.  So many options!
Tomorrow, I'm heading up to Utah again so we can roll up our sleeves, tie back our hair and work on this project together.   
Cross your fingers and wish us luck!  We hope it turns out as great as we imagine.

July 13, 2010

Spreken Sie Deutsch?

Genius! 
This German-based shop creates these peices from mis-matched drawers and shelves.


June 24, 2010

The Speckled Dog

I can't stand this style of table.
It's circa 1993 rounded corners and blonde wood make me wanna puke. Blah.

  I don't think Dax likes this table either. 
Who's Dax?  She's inspiration behind The Speckled Dog.
Now check out the fabulous makeover our friend Kristi from The Speckled Dog did!
The harlequin design is an unexpected detail that I really really dig.
I'm sure Dax loves it too.
Click here to check the details of this makeover.
Thanks for the inspiration Kristi!

June 22, 2010

Rock n' Roll 3

Do you remember our Rockin' Rocker redo?
Check out Megan's version of our rocker from Crazy Domestic
Pretty sweet, right?
Her fabric choice is beautiful!

June 16, 2010

The Controversy

Did you read the controversy about our trash chair turned tree swing
that was featured on the popular online magazine
Apartment Therapy?
Click the Apartment Therapy and read the comments.


Well, all your questions will be answered tomorrow in a complete DIY
including how to tie the knots and weatherproof outdoor furniture!

May 31, 2010

Tree Swing

Currently, I'm in love with all things outdoors...
patios, outdoor rooms, gardens, fresh air and summer.
So today, I'm displaying a tree swing built by my Man.

We found this poor sad little throw-away chair,
$8 at the local thrift shop.

The uphostery was clean and and in good condition so we kept it.
And I really like the retro pattern.
We painted, drilled and sawed.
Now, it's the perfect little hideaway in our secret garden.

Click here for Part 1 of the
DIY: Tree Swing tutorial


Peppertowne has been featured on some amazing blogs, please stop by and check them out! 

If you've featured us and we missed it, please let us know, we'd love to give you a link back!

May 5, 2010

lovely lucite

I haven't found her yet but,
I've been on the lookout for the perfect piece of vintage lucite. 
Wouldn't her modern lines look absolutely stunning paired with something more traditional and heavy.

I love how lucite comes as slightly unexpected and edgy.  
Here are some of my favorite inspirations.

Photo credit domino
Lucite paired with black.  Sigh.  So pretty.

Photo credit apartmenttherapy.com
Photo credit vivafullhouse.blogspot.com
This is a beautifully designed chair.  The scroll back is fantastic!

Photo Credit Keno Brothers
The natural wood and the lucite and all the white...this look is gorgous.

Photo Credit House Beautiful Melissa Warner

Photo credit inglenookdecor.blogspot.com

May 2, 2010

window seat taa-daa!

Confession:  I lost the 'before' picture for this project.

I swear I took the pic.  But where is it?
I've search through the endless piles of photo chaos on my computer.  Oh, don't judge me.  You know the photo chaos...you've been lost in it too. 
The abyss of unmarked photos scattered all over your computer.  

Promise: I promise to save my pictures in a marked and uber-organized way.  At lease until I'm in a hurry or the cheese quesadillas are burning...

Craigslist rules!  I found a photo similar to the coffee table I originally bought.
My coffee table cost me $10 bucks.  But, I needed a window seat!  
I was looking something with modern lines and a neutral feel.

TAA-DAA!!


This was an easy project with some basic upholstery. 

Step #1: Prep and paint the wood frame.
After removing the lovely smoke mirrored glass, I painted the table and then sanded up the edges a bit to let the dark wood show through.

Step #2: Cut some wood board to replace the glass mirrors. 

Step #3: Cut a piece of foam for the bench seat.  The best way to cut foam is a band saw.  But if you don't have one, the second best way is with a sereded kitchen knife.
Glue the foam to the board using spray adhesive.


Step #4: Using a staple gun, cover the foam with a liner cloth. 
Securely staple on the backside of the board.  Use a firm even pressure around the edges.  As you can see in the picture, I use my body weight to push foam in and then staple the fabric.  This makes a nice rounded edge on your seat. 


Step #5: Cover your seat with the upholstery fabric.
Using the same technique as the liner cloth, use a firm even pressure and staple the fabric in place.  Always cut away and excess fabric.  Pull your corners in and staple them like crazy. Remember, the underside of your project doesn't have to look perfect.  This is not an art of perfection...and that's why I love it!  Also, I'm using an air powered staple gun, which is the bomb.  If you don't have access to one of these, a hand powered gun is great.  I've done many many project with a hand gun.
Step #6: Staple your trim.
Adding a trim gives finished look to your project.  Here I choose a burlap natural fiber that fit in with my neutral scheme.  Simply, staple the trim along the edge of your board. 
 
Here's a trick I learned from a great upholsterer, when the two ends of your trim meet, simply unravel the ends, cross them over each other and staple in place on the underside of the board. This way your cushion will fit perfectly without the added bulk of the extra trim.


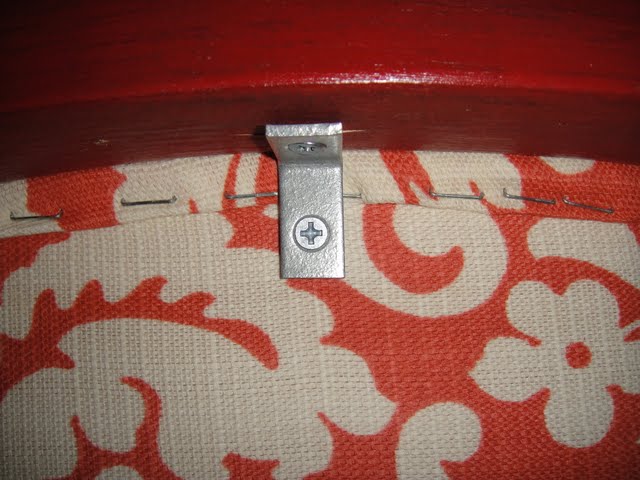
 Step #7: Put your bench together.
Add a few L brackets to secure your seat.

That's it!
Enjoy your bench!


April 27, 2010

Rock n Roll 2

 Many of you have contacted us asking about the details of our little red porch rockers.
You asked...and here it is.

Click here for the original Rock-n-Roll post.
I ask one thing in return...please email me the before and after pictures of your rocker remodel.  I'd love to see all your great ideas post them here on Peppertowne.
Click here to email me your pictures.

Tip, Tricks & a mini-Tutorial
I'm sorry I don't have pictures of the process.

Step #1
Prepare and paint your wood. 
I cut out the lattice cane and the other seat & back material.  If you have a cane seat, leave the ribbon of caning the surrounds the circumference of the seat frame that held the lattice cane in place. The wood on the rockers we found was trashed but with a light sanding and a few coats of red spray paint made a big difference.

Step #2
Create a new seat and back.
Get a thin piece of wood.  We used 1/4 inch MDF but anything will do.  First cut a pattern out of paper or scrap fabic for your seat and back.  Make the pattern slightly bigger than the hole for your seat and back.  This will help when it's time to attach them to the rocker. 
Next trace the pattern onto your wood and cut it to shape.

Step #3
Upholster your seat and back. 
I stapled a thick batting to the top of the seat and back.  Then stapled a lining and then the outdoor upholstery fabric to the top of the seat, trimming away excess and making a tight fit.  Next, cut a piece of upholstery fabric to cover the under side of the seat and back cushion.  Fold the ends of the fabric over and staple tighlty.  You can glue a cute trim around your seam to create a finished look especially if the underside of your rocker will show.

Step #4
Attach the seat and back cushion.
This is much more simple than it seems.  Remember when you cut your board to be a bit larger than the seat and back hole?  Now you can rest the finished cushon on the seat and it will sit on top of the wood of the rocker.  Make sure it fits and position the seat, then add a string of wood glue on the circumference where your cushion and the seat frame meet.  To secure the bond between your rocker
and your cushion add a few L brackets.

That's it!
Do you have other questions?  Send me a quick note, I'm happy to help.
And don't forget to send me your before and after photos!

April 25, 2010

Back in Time

This little garden bench is ho-hum. 
I don't love it.
Saturday a friend took me to a little shop that featured 
heavily weathered and worn pieces.
I was inspired!
I dragged the bench into my shop and began to work.
Now, I love it!!


Do you want to make a drop down for your link parties.
Click here for Amy's great tutorial.
-----

And, some of you have asked, "How did you do this?"

It's simple. 

Step #1:  Paint your furniture piece.  Paint layers of different colors.  On this bench I painted it white and then blue.  A friend and I were coming up with ideas for an old black table she has.  She wants to make create this severly weathered, worn and distressed look with layers of paint.  So, were going to paint a layer of pink and then a layer of white...I can't wait to see how this project turns out.

Step #2: Get out your can of paint stripper.  The same stuff Amy used on this beachy dresser remodel.  Randomly brush the stripper over your painted piece of furniture.  Once the stripper begins to crinkle the paint scrape it off in big and little chunks revealing the different colors below.  I was even able to strip down to the bare wood in some spots which gave this a great organic feel. 

Step #3: Use a stain to 'dirty up' the paint job.  I used a dark walnut.  Using a rag, wipe the stain on and let it sit for a few minutes then wipe it off.  Repeat if you want a dirtier look.
Then you can seal your project with a satin clear coat.

And that's it!
Good luck.  And send us any photos of before and afters of your project!

If you have any other questions about this project, email us here.


April 12, 2010

Meet Brittany

Peppertowne Reader Before & After:
Meet Brittany

I love button tuffting and usually I love orange,
but this retro 70's style rocker had to go.  
In Brittany's words..."YUCK!"
She tackled a tough project that took her more than 6 months and cost her a few bodily injuries!!
Amazing how this red micro-fiber brings this rocker into 2010.

Now just add a pillow
 and her two adorable children reading bed time stories.
Picture perfect.
This upholstery job looks so professional.
Thanks for sharing Brittany!

If you have a before and after project you'd like to feature on Peppertowne, email your low resolution photos here.

Linking up:
The Persimmon Perch
Sumos Sweet Stuff
The Creative Girl
Making the World Cuter
Cottage Instincts
Skip to my Lou
Between Naps on the Porch
Silly Little Sparrow
The Herber Family
Reinvented
Related Posts Plugin for WordPress, Blogger...